Showing posts with label tutorial. Show all posts

Monday, February 23, 2015

How To Integrate BuySellAds To A Page In Blogger


Hello bloggers again in this tutorial we will show you how to Integrate or add a adspace widget directly in blogger rather than sending your visitors to specific BSA Page.
BSA is used to buy and sell ads but unfortunately it is not available for blogger users.

So Let's Start-

Follow these easy steps:
  1. Log into your buysellads account
  2. Navigate to Dashboard and then click on the Tools tab as shown below
tool settings
      3.   Copy the first peace of code snippet
ad sales widget code
       You will see two check boxes. The first box would hide your blog title and the second one will hide the description that appears on your BSA public marketplace page. Since it looks nice to write a well formatted description yourself using rich text editor of blogger therefore I would recommend that you choose to hide only description.
       4.   Now Log into blogger and create a new Page.


To create a Page select Pages from settings menu and then choose Blank Page by clicking on New Page button.
create a new page
        5.   Give this page a short title like "ADVERTISE US"   and write a few lines of description about your blog niche, its range of audience, traffic stats and rankings. Once done, click on theHTML button next to Compose and paste the code you copied in step#3 just at the end of all text present in HTML view. See a demonstration below for our page.
HTML view
      6.  Finally publish this page by clicking the Update button. You are half way done!
Enjoy Adding this widget in blogger :-)

Thursday, February 19, 2015

How To Add Disqus Comment System In Blogger


Disqus is a new comment system used by many bloggers and professional sites even we have also started using Disqus that's why we have written this post. So first What is Disqus? and what are its features?

The image below shows disqus comment system -


Features Of Disqus-

  • Great Design : This is professionally designed by expert web developers. It is having eye-catching and amazing design which will attract your readers to comment.
  • Social Login : One of the best feature is that, on this form your visitors can comment by logging in from social sites like Facebook, Google+, Twitter and many more. However, if someone has not any social account then he can comment as a guest.
  • Real Time Threaded System : Another amazing feature is that it is having real time threaded system which will help you in making discussions easier. Your visitors and you can reply many times on a single comment.
  • Star and Reactions In Comments : You visitors can give the stars to the discussions and this option is available on the top right side of this form.
  • Thumbs Up and Thumbs Down : Thumbs Up and Thumbs Down is also added in this comment system by which your visitors can thumbs up to any comment and by this you'll know which is most liked comment.
  • Edit and Delete Comment : No matter, if you've posted wrong or you're done any mistake in the comment you can edit and delete it.
  • Edit User Comments : Another great feature, you can easily edit your visitors comment. By this you can get rid of those commentators who are adding links in comments.
  • Related Discussions : On the bottom of this system, it shows the related discussions or "Also on (Your Blog Name)". By this you can get more comments on different and even your bounce rate will be improved.
  • Comment Moderation : You can also enable comment moderation in order to approve each and every comment made by your readers.
  • Spam Detector : You will be safe from spammers because this system is having spam detector which will catch the spammers and those spam comments will not be published, even they will be saved in the spam folder. And many more features are available in this system.

So How To Add This Disqus System-

After telling you the information of this comment form, now you may want to integrate it in your blog and that's the topic of our today's post. But without the information the post looks like straw meal and we've added some spices as information. Not funny ? Well, let's begin the tutorial.
  • Go To Disqus >> Click On "Get This On Your Site" Button.
  • There You Will See The Registration Form. Fill All The Fields To Sign Up.
  • In The Next Step, You Will Be Asked For Choosing The Platform. So Just Choose "Blogger"
  • After choosing platform, you will be landed to another page from where you can integrate that commenting system in your blog and importing blogger comments to this one.
  • So first of all, we're going to integrate the from and then we'll import the comments.

Adding DISQUS In Blogger

  • Click on "Add (Your Blog) To My Blogger Site" Button
  • After That, The New Window Will Open Where You Will Be On Blogger. There You Will Be Asked For Your Blog, So Choose Your Blog And Click "Add Widget" Button.
  • Now You've Successfully Added That System In Your Blog. And Let's Import The Comments Now.

Importing Comments

  • In order to import the comments, go back to the DISQUS tab and there you will see the importing comments from blogger in the second line.
  • On that line click on "Tools > Import"
  • Then you will be on "Import Tool". There you've to click the "Import Comments From Blogger".
  • Now Google will ask for the permission for grant access. Just click "Grant Access" button to give the permission.
  • Now finally choose your blog and click on "Import" button to complete the process.
  • Now you will see the message that your import has been successfully uploaded and queued. Now you've to wait for 24 hours to get the comments completely imported.
    • That's All! Disqus system has been installed in your blogger.

Wednesday, February 18, 2015

How To Add Translate Button In Blogger


Are you new to Blogger? Still learning the new blogger then this post is very useful to you as in this post you will learn how to add a translate button in blogger. This tutorial will help you to understand the basics of blogger. So Let's start-


  •  Then Choose an appropriate position where would you like to add translate button. (Usually at last and at middle right)
  • The click Add a Widget and then scroll down to find Translate and finally click Save.
Now You Have Successfully added a translate button to your blog. 

Tuesday, February 17, 2015

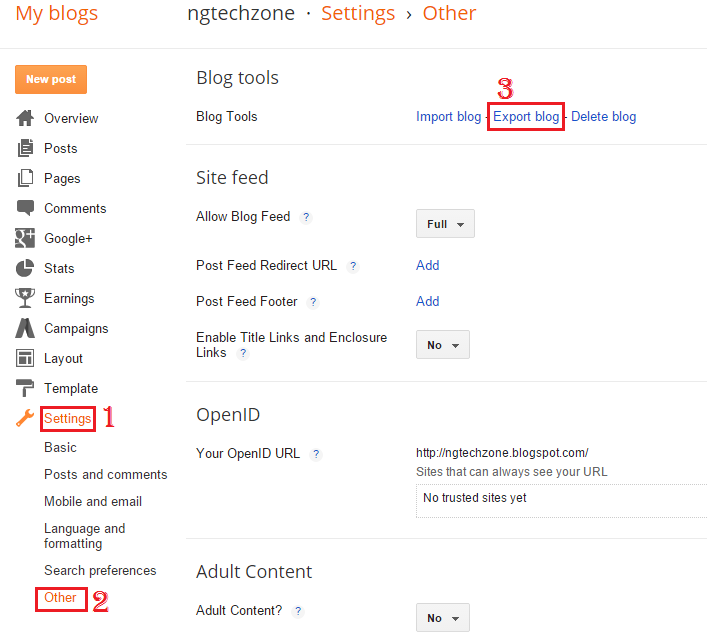
How To Backup Blogger Posts

Learn How To Backup Blogger Posts


Welcome Bloggers you must have wanted to backup your hard work in blogger meaning you must have wanted to backup your Posts!!. This tutorial will help you to do that very Easily.
Every Blogger Wants to save his hard work done that's why we recommend to backup your post at least 1 time in a month so that in any emergency condition you may backup it.
So Let's Start-


  • Go to Blogger Dashboard  
  •  Go to Setting Page Of your blog and then click other and then finally click export blog. image is shown below-

  • After that an popup will come and then click Download. A file will be downloaded keep it.
  • Now if you want to backup your post repeat 1-2 steps and then click Import Blog and upload your file and then your posts will get backup ed.
  • Note- After You backup your posts meaning after you import blog posts the new posts will be deleted!!! So Be carefull.
So what are you waiting for backup your posts now!!! And Have a nice day :-)

Sunday, February 15, 2015

How To Redirect From One Page To Another In Blogger

How To Redirect From One Page To Another In Blogger


Many Bloggers try to redirect users from one page to another but face many problems and don't know how to redirect from one page to another. For example you want to redirect from error page to homepage then redirection will help you a much lot. So you have come to the right place to Learn redirection .

So How To Redirect?

1- Open any page or post which you want to redirect.
2- Switch to HTML Tab.
3- At Last Paste 

<meta http-equiv="refresh" content="5; URL=http://ngtechzone.blogspot.com"> 

Replace http://ngtechzone.blogspot.com to your redirect url (url which you want to send users to)

Now Finally Click Save and Enjoy your redirect page.